Step 1: Enable the iSheets module on your site within HighQ
- Log on to your HighQ site and click on the Admin tab.
- On the left navigation bar, click on Modules which is located under Site settings.
- In the list of modules, enable the iSheets module and click Save.

Step 2: Create iSheets via Excel files
- Contact your Customer Success Representative to obtain Excel files to be imported as iSheets in your HighQ site. These Excel sheets are labeled as [DC] Signers and [DC] Rows, and contain column names that are required to enable the data sync between your Dealcloser project and HighQ site.
- Log on to your HighQ site and click on the Admin tab.
- On the left navigation bar, click on Active iSheets link which is located under Module settings > iSheets.
- On the top of the iSheets page click on Add, then From an Excel file.
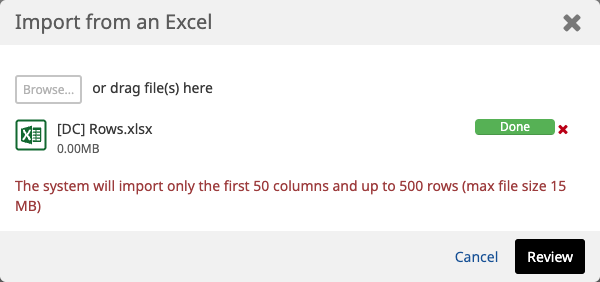
- Choose the Excel file name [DC] Signers.xlsx, then click Import.
- Once uploaded click Review.


It is important to have the name of the iSheet match the name of the excel file.
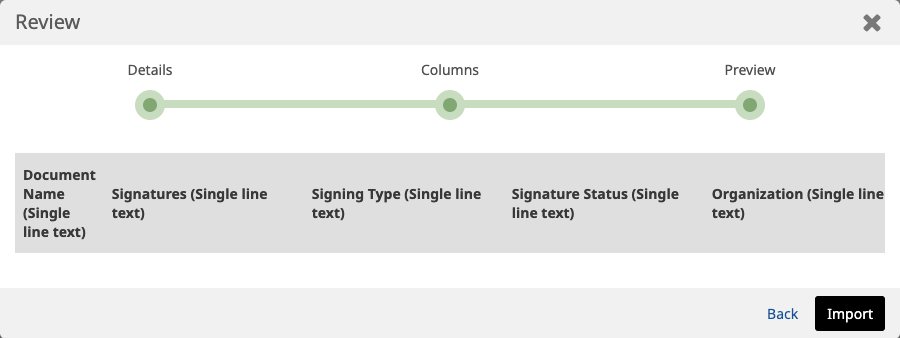
- Note the column headers at the bottom of the screen have been populated from the Excel file. From here, click Next.
- Make sure all the column types are set to Single Line Text. Once verified, click Next.
- You’ll then be taken to the Preview screen. Verify everything once more and click Import.

- You’ve successfully added the [DC] Signers iSheet and it will now appear in your Active iSheets list (you may need to refresh your browser).
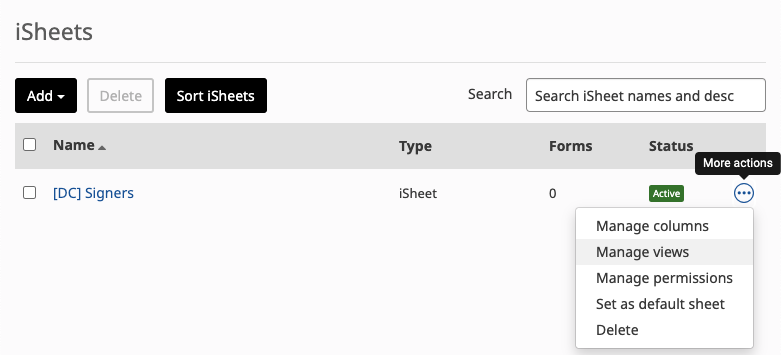
- Click on the More actions menu beside the [DC] Signers iSheet, then click Manage views.
-
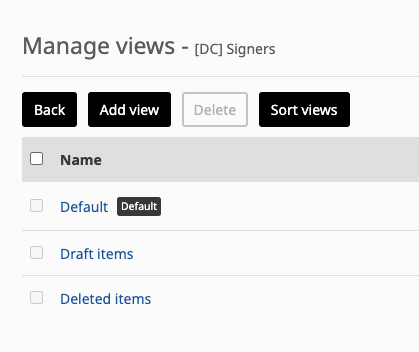
Edit the default view by clicking Default.
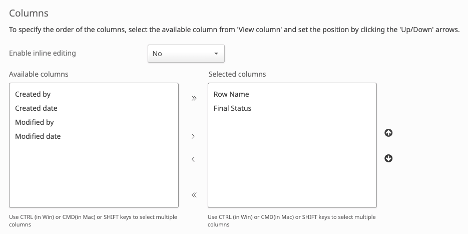
- In the Edit view screen, scroll down to the Columns section. Here you’re going to move the columns listed below from the Selected columns list on the right, back into the Available columns list on the left:
- Created by
- Created date
- Modified by
- Modified date

- Once complete, scroll down to the bottom of the page and click Save.
- Now we’re going to add the [DC] Rows iSheet. On the top of the iSheets page click on Add, then From an Excel file.
-
Choose the Excel file named [DC] Rows.xlsx, then click Import.
- Once uploaded click Review.
It is important to have the name of the iSheet match the name of the excel file.
-
Note the column headers at the bottom of the screen have been populated from the Excel file. From here, click Next.

-
Make sure all the column types are set to Single Line Text. Once verified, click Next.

-
You’ll then be taken to the Preview screen. Verify everything once more and click Import.

- You’ve successfully added the [DC] Rows iSheet and both will now appear in your list (you may need to refresh your browser).

- Click on the More actions menu beside the [DC] Rows iSheet, then click Manage views.

- Edit the default view by clicking Default.

- In the Edit view screen, scroll down to the Columns section. Here you’re going to move the columns listed below from the Selected columns list on the right, back into the Available columns list on the left:
- Created by
- Created date
- Modified by
- Modified date
- Once complete, scroll down to the bottom of the page and click Save.
Step 3: Create a Closing Dashboard in HighQ
Step 1: Create iSheets via Excel files must be completed before moving onto Step 2.
We’re going to create a Closing Dashboard section with 3 panels:
- Checklist Status
- Signature Collection
- Signer Status
To create a new section on your HighQ Dashboard, follow the steps below:
- Go to your site’s Dashboard, then click the Add section button.
![]()
- Organize the section in 3 columns of equal width by clicking on the icon in the top-left corner.

To create the Checklist Status panel, follow the steps below:
- Click the plus sign in the first box of the section.

-
A pop-up will appear listing the different types of panels to choose from. Select a Data Visualization panel.

-
The name of this panel will be Checklist Status, and the other details can be filled in according to the table below:
|
Setting |
Value |
|
Panel title |
Checklist Status |
|
Site |
<YOUR SITE> |
|
Source |
iSheets |
|
iSheets |
[DC] Rows |
|
View |
Default |
|
Chart type |
Standard Pie |
|
Category |
Final Status |
|
Value |
Count of Final Status |
- When you are finished, click Add.

Your chart may be empty to begin with. This is because there is no data available yet in Dealcloser, and therefore no data in your iSheets to populate the charts. The data will be populated automatically when your Dealcloser project has relevant activity, and every 15 minutes after.
To create the Signature Collection panel, follow the steps below:
-
Go to your site’s Dashboard and click the pencil icon on the right to edit (hover your mouse just below the bottom of the toolbar on the right as it may be hidden).

-
You’ll be taken to the edit section of the page where you can add a panel. Click the plus sign in the middle of the section to Add panel.

-
A pop-up will appear listing the different types of panels to choose from. Select a Data Visualization panel.

-
Another pop-up will appear where you will configure your panel. First we will create the Signature Collection panel by entering the information below:
|
Setting |
Value |
|
Panel title |
Signature Collection |
|
Site |
<YOUR SITE> |
|
Source |
iSheets |
|
iSheets |
[DC] Signers |
|
View |
Default |
|
Chart type |
Standard Pie |
|
Category |
Signature Status |
|
Value |
Count of Signature Status |
-
When you are finished, click Add.

Your chart may be empty to begin with. This is because there is no data available yet in Dealcloser, and therefore no data in your iSheets to populate the charts. The data will be populated automatically when your Dealcloser project has relevant activity, and every 15 minutes after.
To create the Signer Status panel, follow the steps below:
-
Go to your site’s Dashboard and click the pencil icon on the right to edit (hover your mouse just below the bottom of the toolbar on the right as it may be hidden).

-
You’ll be taken to the edit section of the page where you can add a panel. Click the plus sign in the middle of the section to Add panel.

-
A pop-up will appear listing the different types of panels to choose from. Select a Data Visualization panel.

-
Another pop-up will appear where you will configure your panel. First we will create the Signature Collection panel by entering the information below:
|
Setting |
Value |
|
Panel title |
Signer Status |
|
Site |
<YOUR SITE> |
|
Source |
iSheets |
|
iSheets |
[DC] Signers |
|
View |
Default |
|
Chart type |
Stacked Bar |
|
Category |
Organization |
|
Value |
Count of Signature Status |
|
Series |
Signature Status |
-
When you are finished, click Add.

Your chart may be empty to begin with. This is because there is no data available yet in Dealcloser, and therefore no data in your iSheets to populate the charts. The data will be populated automatically when your Dealcloser project has relevant activity, and every 15 minutes after.
- Hover your mouse on the top-right corner of the panel, then click Save.

Your Closing Dashboard is now set up and you are free to customize the look and feel of these charts as desired by your firm.